CSV files are commonplace nowadays. Hence knowing how to convert CSV to Excel is a useful skill. CSV files are especially useful when wanting to save a table worth of data in a simple to read format. CSVs are also easy files to create and read from – as they are basically text files with a .csv file extension. That means they easily open in Wordpad, Notepad, Word and virtually any other text editor.
- Each row represent a single record
- Each column represents a certain property
- Each “cell“, or in other words columns within a row, are separated by a certain delimiter. Usually a comma , character (but not only!)
- Usually the first row is the header – contains names for each column
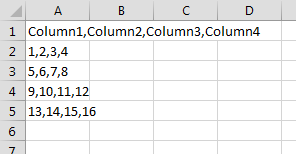
Today I want to show how you can quickly convert a CSV file into an Excel XLSX file. I will base this tutorial on the following example of a CSV file:

Open the file in Excel
Simply double click on the file or if needed right-click and Open with the file in Microsoft Excel. The file should open showing only a single Worksheet like shown below:
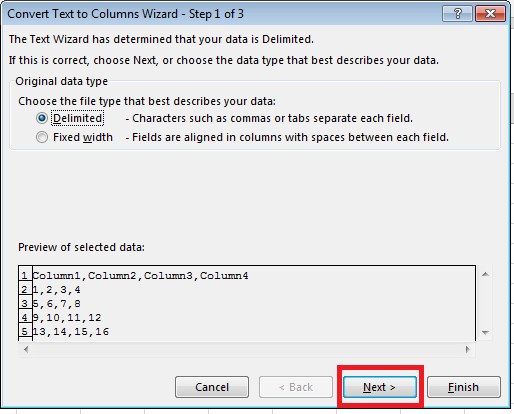
Select first column and proceed to Text to Columns
Select the entire first column where all your data should be located. Next click on the Text to Columns button in the DATA ribbon tab:

Proceed according to Wizard instructions
This is the hard part. Text to Columns need additional information on the delimiter and format of your columns.
Delimited or Fixed width?
CSV files are usually delimited using a specific character (like a comma or semicolon), in this case select Delimited. Sometimes however columns are fixed width, separated by spaces, in this case select Fixed width. Next click Next to proceed.
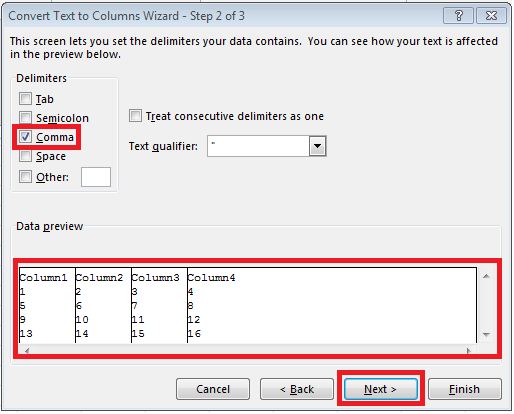
Select delimiter
Assuming your columns are separated with a specific delimiter you need to provide this delimiter in the Wizard. Look at the Data preview to make sure your columns will be separated correctly. When finished proceed with Next
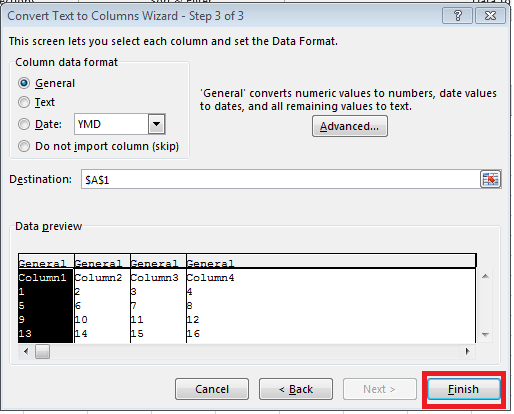
Format your columns (optional)
The last step is to format your columns if needed. If your columns represent Dates or you want to pull a column containing numbers/dates as text instead – be sure to format it appropriately. Usually, however, you are fine with hitting Finish:
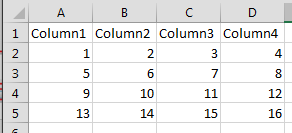
Admire your Excel converted CSV file
If you have proceeded according to the steps above you should have a neatly formatted spreadsheet like the one below.
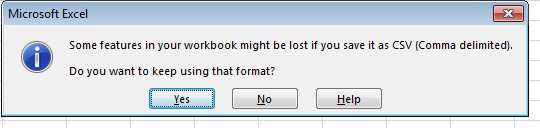
One last thing as Steve Jobs used to say… Remember to save the file as an Excel XSLX (or XLSB or similar) file:
Convert multiple CSV to Excel with VBA
If you have multiple CSVs you want to convert or pull into an Excel file the above approach may be a big burden. So lets use some VBA macros to help.
Import entire CSV
The below is take straight from my Read file in VBA blog post. This pulls a single file into the destRng Excel range.
Dim ws as Worksheet, destRng as Range, fileName as String
Set destRng = Range("A1")
Set ws = ActiveSheet
fileName = "C:\text.csv" 'Replace with file name
With ws.QueryTables.Add(Connection:= "TEXT;" & fileName & "", Destination:=destRng)
    .FieldNames = True
    .RowNumbers = False
    .FillAdjacentFormulas = False
    .PreserveFormatting = True
    .RefreshOnFileOpen = False
    .RefreshStyle = xlInsertDeleteCells
    .SaveData = True
    .AdjustColumnWidth = True
    .RefreshPeriod = 0
    .TextFilePromptOnRefresh = False
    .TextFilePlatform = 852
    .TextFileStartRow = 1
    .TextFileParseType = xlDelimited
    .TextFileTextQualifier = xlTextQualifierDoubleQuote
    'Select your delimiter - selected below for Comma
    .TextFileConsecutiveDelimiter = False
    .TextFileTabDelimiter = False
    .TextFileSemicolonDelimiter = False
    .TextFileCommaDelimiter = True
    .TextFileSpaceDelimiter = False
    .TextFileTrailingMinusNumbers = True
    'This will refresh the query
End With
Import selected CSV rows
Now a more interesting and complex scenario – let us assume we want to import just some rows of our CSV. Fortunately Excel (as well as Access) support SQL queries. We can therefore do a simple SELECT query to upload all records or add some filtering (using WHERE clause), grouping (using GROUP BY clause) and etc.
'Assuming file looks like this. File path: C:\test.csv
'"Col1", "Col2", "Col3"
'1     , 2     , 3
'11    , 12    , 1
'2     , 5     , 6

Set rs = CreateObject("ADODB.Recordset")
strcon = "Provider=Microsoft.Jet.OLEDB.4.0;Data Source=C:\;" _
& "Extended Properties=""text;HDR=Yes;FMT=Delimited"";"
strSQL = "SELECT * FROM test.csv WHERE Col1 > 10"
rs.Open strSQL, strcon, 3, 3
rs.MoveFirst
Do
   col1 = rs("Col1")
   col2 = rs("Col2")
   col3 = rs("Col3")
   rs.MoveNext
Loop Until rs.EOF
The above will only pull the second row as Col1 is > 10.
Convert CSV to Excel tips
CSV files are usually used when a file contains a large amount of data. Excel tends to bloat pretty quickly although it compresses the data pretty well. Nevertheless you might find yourself struggling with Excel performance or even experiencing an Excel crash. What to do? Save the file as an XLSB – read more here.


")