A VBA Progress Bar can be used to manage your users anxiety about the execution time of your VBA Macro. Sometimes there are very large and complex solutions built in Excel (which is a mistake mind you), where calculations or macro executions can take minutes or even hours. This causes many issues, especially for the end users who usually do not know how long processing the calculations/macros will take. In such cases it is important to notify the end users of the progress of your macros/calculations so they can switch to other activities. This is where the VBA Progress bar can aid you.
For one of my older projects I needed a VBA Progress Bar that would show:
The current progress of the computations
How much execution time was left (estimation)
Users especially wanted to know how much execution time was left – whether they should grab a coffee or stay and wait for the macro to finish. Calculating this is best done by approximating the time it took to run
Animated VBA Progress Bar Example
The easiest approach to animating an Excel is to create a simple VBA UserForm with the use of a label control which width you can manipulate to show the current progress. Easy and straightforward.
Sub ExampleProgressBar()
Dim pb As ProgressBar
Set pb = New ProgressBar
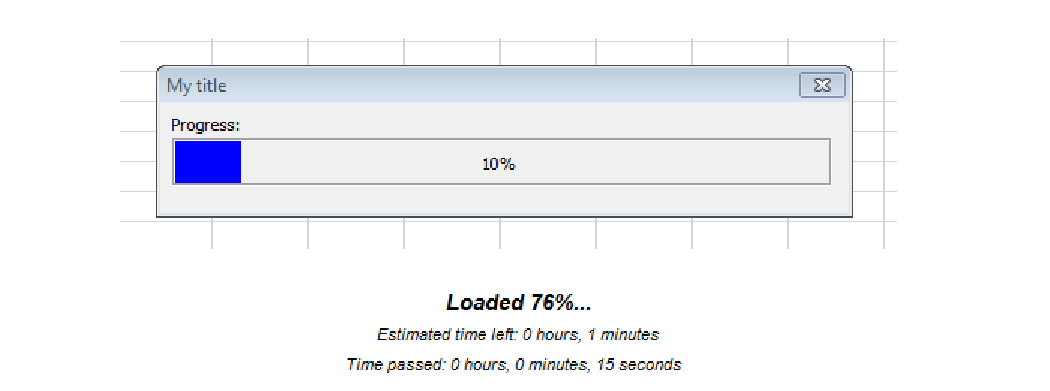
pb.Initialize "My title", 100
'Add 10% progress
pb.AddProgress 10
'...
'Hide and remove the Progress Bar
pb.Hide
Set pb = Nothing
End Sub
The result:
Create your VBA Progress Bar
Below find a quick tutorial of how to create your own VBA Progress Bar User Form!
Create a customer User Form
First you need to create a customer VBA User Form. Click on the link in case you want a tutorial on how to create these.
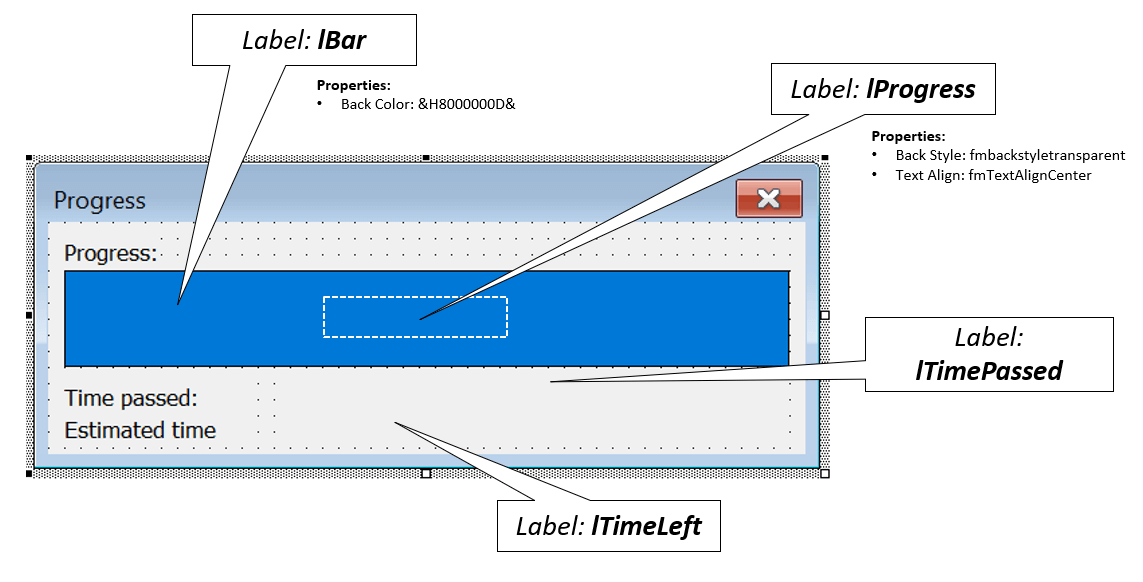
It is best to rename your UserForm e.g. to ProgressBar. Next add 3 VBA Labels to the User Form and change some selected properties per the image below:
Copy the VBA Progress Bar Source Code
Now we need the logic that will allow you to configure and run the Progress Bar. Right click on your new User Form and click View Code. Next copy past the code below:
Dim progress As Double, maxProgress As Double, maxWidth As Long, startTime As Double
Public Sub Initialize(title As String, Optional max As Long = 100)
'Initialize and shor progress bar
    Me.Caption = title
    maxProgress = max:  maxWidth = lBar.Width:    lBar.Width = 0
    lProgress.Caption = "0%"
    Me.Show False
    startTime = Time
End Sub
Public Sub AddProgress(Optional inc As Long = 1)
'Increase progress by an increment
    Dim tl As Double, tlMin As Long, tlSec As Long, tlHour As Long, tlTotal As Long, tlTotalSec, tlTotalMin, tlTotalHour
    progress = progress + inc
    If progress > maxProgress Then progress = maxProgress
    lBar.Width = CLng(CDbl(progress) / maxProgress * maxWidth)
    DoEvents
    tl = Time - startTime
    tlSec = Second(tl) + Minute(tl) * 60 + Hour(tl) * 3600
    tlTotal = tlSec
    If progress = 0 Then
        tlSec = 0
    Else
        tlSec = (tlSec / progress) * (maxProgress - progress)
    End If
    tlHour = Floor(tlSec / 3600)
    tlTotalHour = Floor(tlTotal / 3600)
    tlSec = tlSec - 3600 * tlHour
    tlTotal = tlTotal - 3600 * tlTotalHour
    tlMin = Floor(tlSec / 60)
    tlTotalMin = Floor(tlTotal / 60)
    tlSec = tlSec - 60 * tlMin
    tlTotal = tlTotal - 60 * tlTotalMin
    If tlSec > 0 Then
        tlMin = tlMin + 1
    End If
    'Captions
    lProgress.Caption = "" & CLng(CDbl(progress) / maxProgress * 100) & "%"
    lTimeLeft.Caption = "" & tlHour & " hours, " & tlMin & " minutes"
    lTimePassed.Caption = "" & tlTotalHour & " hours, " & tlTotalMin & " minutes, " & tlTotal & " seconds"
    'Hide if finished
    If progress = maxProgress Then Me.Hide
End Sub
Public Function Floor(ByVal x As Double, Optional ByVal Factor As Double = 1) As Double
    Floor = Int(x / Factor) * Factor
End Function
Configure and Run
Now a quick explanation of the VBA Functions defined above:
Initialize (title As String, Optional max As Long = 100)– needs to be run first. Initializes the variables needed to run the Progress Bar and allows you to set the title of the User Form and the max i.e. maximum % progress. By default max is set to 100 but you can change this e.g. you want to process 200 files then set it to 200
AddProgress (Optional inc As Long = 1) – add inc incrementally to the amount of total progress. Assuming if you want to process 200 files and set the max value in Initialize and you processed 3 files then run AddProgress with inc equal to 3. When you process another 4 files then run AddProgress with inc equal to 4.
Now that we know the functions needed to run the Progress Bar let us configure and run your Animated Progress Bar in Excel. I added step by step comments to the example code snippet above.
'Declare and Initialize the ProgressBar UserForm
Dim pb As ProgressBar
Set pb = New ProgressBar

'Set the Title for the ProgressBar and the Maximum Value making the UserForm visible
pb.Initialize "My title", 100

'Use the ProgressBar to track macro execution by running the For loop 100 times
For i = 0 to 99
    pb.AddProgress 1 'Add 1% progress
    '...
Next i

'Clean-up: Hide the ProgressBar
pb.Hide
'Free up memory
Set pb = Nothing
I hope this was helpful. Managing the expectations of you users is key to creating effective automations in Excel VBA. Be sure to also check out ways to enhance the performance of your VBA Macros.
Download VBA Progress Bar
The VBA Progress Bar is part of the VBA Time Saver Kit. Feel free to download the full kit using the link below: